One woman's adventures in the land of hand made jewellery

Thursday, 26 May 2011

Handmade Thursday...


..or any other day in my case but as Thursday is the last day before the weekend here in Dubai and a day when not much happens in my otherwise busy schedule I usually get more time to be creative. So when I stumbled across White Lily's blog and her Handmade Thursdays I couldn't resist sharing it with you nor posting something from me!


Today has been no exception in the extending chain of Thursdays so far in 2011, some further work on an as yet unfinished silver clay peapod pendant this morning. Then I also fired and burnished a couple of tiny squiggly square bits of clay ready for some future earrings, made two necklaces and a saucepan of vegtable soup and that was just my mornings efforts.

The first necklace was my entry in a challenge (see today's previous post) whilst the necklace pictured above is made from some beads I found amongst a huge second hand lot I bought on eBay a few months ago. These ''beads'' (they are not exactly round) are big chunks of pink resin, some clear and some frosted. Surprisingly for their size they weigh very little. I've teamed them up with some gold-coloured, wavy plastic spacers, 60cms of fancy cream giftwrap chord, a couple of smaller gold-coloured metal beads with large holes and a gold-coloured toggle fastening. The latter was bought in Texas when I was there last year. It was also an opportunity to practise some knots rather than using jump rings or other mechanical means to join components together!

If you want to have a go at something like this, here is how I assembled it.
  • First wrap some sticky tape tightly round either end of the chord to stop it fraying as you thread it through the beads. Double up the chord and thread both ends through the chunky beads adding a gold spacer after each one, I alternated the frosted and clear beads. 
  • Use a sheetbend to join the ends of the chord together and apply a little clear nail varnish or superglue to hold the knot firm. Adjust the chord so that the knot sits close to one of the end beads and when you hold it up by the two loops the central bead is in the middle. 
  • Next thread on a few more spacers to cover the knot on one side, add a metal bead. Then add spacers and a metal bead to the other side to match. 
  • Taking the doubled chord tie a series of three overhand knots close to the beads on either side to hold everything in place (more if you need to shorten the necklace length), then push each loop through the eye in the fastening and pull over the fastening to create a larkshead knot.
One Pink Chunks or is that Punk Chicks necklace!

For more on Handmade Thursdays click on the button below

Inspire Me Beautiful

Cache-Cache Challenge

The lovely scene to the left is a painting from 1873 by Berthe Morisot, the first of the female impressionist painters. Entitled Cache-Cache (Hide and Seek) it also sets the theme for this months Art Bead Scene challenge.

I loved the colour palette (see below) derived from the picture. And having just made my first silver clay bead from an oddment of clay I'd rolled out, thought I would try making something that combined both. I have also wanted to try making something a bit "folksy'' inspired by some of the slender pieces I've seen for sale in the shops recently. This challenge was my chance to put everything together.

So with a handful of silver speckled glass beads in pale mauve, green, cream and brown plus a hand-made silver wire hook and some shimmery brown embroidery silk, my very first bead has become wearable. Crocheting embroidery silk to form mock chain either side of the central interest is a great way of making a soft delicate thread for a necklace.

Not only is this my first hand-made bead it was also a trial with patterning the surface of the clay using a texture sheet. I am pleased with the result though the pattern is so fine my photography skills don't do it justice.

Finished Piece


Bead Close Up

Monday, 16 May 2011

Necklace Blues

Looking Across Weymouth Harbour
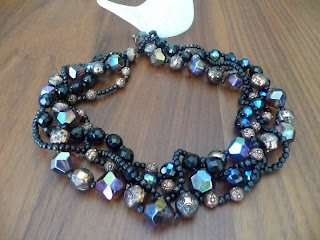
Its been a while since my last post, I've been on hols in the UK then seemed to dive into all sorts on my return except jewellery making. Anyway while sitting in Weymouth Harbour one afternoon during Easter week I strung four strands of beads on some nylon I found in the bottom of my boat bead stash judging from the reel it was probably fishing line. Yes, I have managed to establish bead stashes all over the place rather like a squirrel hoarding nuts for the winter, Dubai, boat and our lock up garage in the UK!

The design idea I had was for a chunky collar style with the four strands plaited together and having choosen a variety of black or dark brown beads I had in mind a piece to dress up a casual white or black (t-)shirt for the evening. The larger glass beads are multi-faceted and reflect rainbow-like hues whilst the seed beads used are matt black plastic with a hint of gold. To add to the overall midnight effect I included two sizes of copper coloured beads. Stringing was easy even if it meant a trip to the lovely Jezebels Jewels in St Mary's St, Weymouth for some small copper spacer beads decorated with pretty flowers. Plaiting was quick and the piece seemed to be coming together. What I lacked was some form of fastening prefereably in copper or black, my stash has silver coloured catches and jump rings a plenty but nothing to compliment my efforts.

Eventually I knotted the strings loosely together and buried them in the contents of my sailing bag for the trip back to Dubai. Back home I realised I still had nothing suitable - gold, antique silver and even brass but nothing copper coloured. The strands languished on my workbench teasing me each time I entered the room. Then for several days I mulled over ideas, pulling books and back copies of magazines off the shelf to flick through the pages until inspiration hit. But I wasn't completely confident the idea would work so I continued to mull it over and sketch it on bits of paper.  Over coffee with some craft-y friends I mentioned my dilema and Leanne, another a far more skilled jewellery maker encouraged me to give it a go. So here is what I did:

I took two long lengths of thinner nylon beading thread each twice the length of my original strands. I then strung some of the matt seed beads onto both lengths and slid them to the middle ensuring there were enough seeds to fit snuggly around one of the large dark brown glass faceted beads. This will form a loop fastening with a large faceted bead on the other end of the necklace as the toggle. Then all four ends were threaded through a single seed bead and one of the larger sized "copper" beads. Then I took each of the resultant four strands and restrung my original four strands and plaited them together fairly loosely. A beading needle helped me mostly pick up the beads off their original strands which speeded things up a bit and helped me keep fairly close to the original pattern.

Next all four threads were threaded through a single seed bead, one large faceted bead (the toggle) and another seed bead before returning back through the previous two beads. Then I spent sometime easing each strand tight in turn, threading its tail down through one of the strands of beads before knotting it round the thread, threading it through three or four further beads and trimming the end.

The end result was a simple bead and loop fastening which ensured the continuity of the pattern right around the necklace. And the necklace itself is a chunky piece that catches the light and sparkles beautifully, just waiting for someone to wear on a night out. The lesson learned was to think through the fastening before stringing the beads. If I'd done that I would have been able to wear the necklace when we dined at Perrys in Weymouth that week!

Thursday, 12 May 2011

Very Chuffed....

....to find that my entry in the Make Jewellery Issue 25 challenge was the winning one!

I was inspired by the pearls and chain set that was part of the Match Point designs on p27 of the magazine, a gold chain and creamy pearl concoction.  I didn’t have quite the same ingredients in my stash but I did have some lovely soft mauve glass pearls and a length of antique-silver chain that I had already earmarked to put together for a smart day to evening necklace so the unusual, asymetric design in May's magazine was timely and the challenge the kick start needed to make it. Apologies for the rather overlit photograph below, defintely need to practise.


Here's what deputy Editor Melissa said about my efforts:


Hello everyone,
Once again we’re delighted to announce the winner of the Make Jewellery challenge, for issue 25! The main themes of vintage and steampunk inspired some fabulous entries, that were truly striking!
After much deliberation, we finally came to a decision, so it’s congratulations to bahrain susie with her lovely pearls and chain set inspired by the project Match Point in issue 25 (p27). She’s made the design her own by using antique silver chain and soft mauve pearls to create a look of understated elegance in keeping with the vintage theme. So congratulations (and PM your address to me at melissa@aceville.co.uk so we can send out your prize!).
I’d also like to thank everyone else who entered and don’t forget, we will be running another challenge based on issue 26 very shortly. Please do check it out and enter again, and spread the word to your fellow forumites - good luck!
Melissa 

If you'd like to see the other lovely entries then go here. Perhaps this post might inspire you to enter the next challenge (Issue 26) when its announced later this month. Meanwhile it'll be sometime before the cheesy grin is wiped off my face.