One woman's adventures in the land of hand made jewellery

Thursday, 17 November 2011

Helping Hand

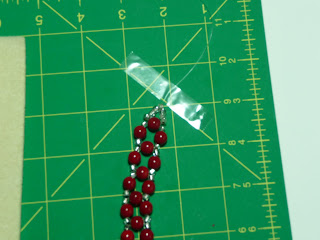
The non-working threads stuck down
 Don't you sometimes wish you had someone around to hold things whilst you use both hands to work on a tricky bit of jewellery?

I found myself in this situation when working on piece of bead weaving. Having created a seed bead loop to attach the threads to a pendant I needed to keep the tension on the loop whilst working on the bead weaving for one side of the necklace. My solution - stick the pair of threads that would eventually become the other side of the necklace to the worksurface.


Having adapted a project from a magazine I wasn't entirely certain how long the side I'd beaded first needed to be so, rather than finish it off with a crimp and one half of a clasp, I again resorted to sticky tape to hold the ends whilst I worked the other side. It took me a couple of tries to find the right position to stick the threads down to ensure I could comfortably work on the second part.

Once the beading was complete on both sides it was simple to hold the piece at my neck in front of a mirror and find that I needed to remove several pattern repeats to achieve the right length. I was quite relieved to have used tape rather than a crimp!

You can see the completed necklace here

Handmade Thursday

Green Glass Band

This weeks bracelet is one that has been sitting on my workbench for a while. I finished stitching the bead band last month in just a couple of days but then how to complete it? I had ideas of ornamenting the band with fringes and beaded flowers but after adding just two flowers decided I didn't want to cover up these lovely square glass beads and unpicked my additions. 

A rumage through my button box turned up the "Roman" coin, then it was just a case of creating a loop for the other end but it sat for ages while I argued with myself on whether or not to add a fringe, eventually impatience won out and I simply added the button and a loop fastner.


Inspire Me Beautiful

Wednesday, 16 November 2011

Seasonal Challenge

This months MJ Challenge is to produce a piece of jewellery based around the main theme of Christmas, or one of the other themes or projects in Issue 32 of the magazine. So either a unique creation, or a piece based on one of the featured projects could be entered.

I decide to mix and match basing my entry on the cross-weave technique project (MJ page 69) but using Christmassy shiney red glass beads and a rhodium plated flower pendant that looks a little like a poinsettia. By using slightly smaller beads than those originally specified the result is a open lacey collar. The interspersed seed beads are silver foil lined clear glass which just add to the sparkle. All that's needed now is an outfit to wear it with over the Christmas season!

If you'd like to enter the challenge yourself then click here for more details. It closes on November 30th, overseas entries welcome.

Thursday, 27 October 2011

Handmade Thursday


I love earrings but have always shied away from making my own hooks until recently when I bought a book* offering a myriad of wire earring ideas. I own a beautiful pair of sterling silver earrings that I bought in Sweden several years ago that consist of a single wire bent in half with a loop at one end from which dangles a tiny silver ball. Inspired by them and guided by the book here are my first entirely-made-by-me earrings!

Take ten centimetres of wire, turn a tiny loop at one end, add some beads, bend the wire at right angles in the middle above the beads then use your fingers to smooth one or both sides into a pleasing curve. Finish off by carefully filing the tip of the wire smooth so it won't tear or scratch your ear.  Also ensure that the loops face the same way on each earring, I noticed when photographing this pair that mine don't quite match!

These wires are silver plate as I didn't want to waste any expensive sterling wire but I am so pleased with the result I think I now trust my self to remake them in sterling silver.


Inspire Me Beautiful
For more Handmade Thursday ideas click on the image to the right

* The book is called 101 Wire Earrings by Denise Peck and is published by Interweave ISBN: 9781596681415

Bracelet Inspiration

Pink craft wire coils made on a size 2 knitting needle,
blue glass beads and "silver" daisy spacers, 
all threaded on memory wire with a simple clasp


Reversible bracelet in right angle weave using creamy glass pearls,
green crystal rondals and gold seed beads,
overstitched with crosses in god seed beads 


Ready made caged beads joined with twisted wire jump rings
to create four circles of beads. Two circles were
placed either side of a larger bead as a focal.

A bracelet stack - four circlets of plastic beads threaded on
beading elastic with a couple of metal beads to add sparkle.

Crystal hoops - glass bicones on memory wire.
The blue and grey one also includes some African seed beads

Crystal clusters are easy to make. Thread 8 bicones onto
individual headpins and wrap a loop on top. Take 5 or 6 cm of
wire wrap a loop at one end thread on a bicone then all the
headpins top with another bicone then arrange the pins to
make the tightest possible bundle before wrapping another
loop in the open end of the wire as close to the beads as
possible.

Friday, 3 June 2011

A Small Disaster Averted

It's been a while since I made any earrings at all but recently when working on an as yet unfinished silver clay project I had a scrap of rolled out clay left. Having impressed it with a swirly texture I hand cut two tiny squares and pierced each piece of damp clay close to one corner.

Once dry the result was a bit of a disaster. Sadly I realised that the texture was somewhat marred by my pawprints! The two disappointing squares sat on my workbench accusing and challenging me everytime I sat down to work for several weeks. Silver clay is expensive and I really felt I'd wasted these particular pieces. Then inspiration struck, I could cover up the fingerprints with more clay...

Holding both dangles together I sanded their edges to ensure both pieces were a similar shape and size. Next I brushed the fronts with a little thin paste to dampen them before using a syringe to add some random squiggles to each. Once dry, torch fired and brushed, a little burnishing picked out the top layers of squiggles so they gleam when worn.

There was another small hiccup when I realised that the hole on one of the resulting dangles wasn't quite large enough all the way through for a jump ring. Twenty minutes patient work with a needle file and a beadreamer and this was soon rectified. So all in all my beginner mistakes were overcome, lessons were learnt and a potential disaster averted. And as a bonus I now have a shiney new pair of earrings to wear! I just need to practise my photography...

Thursday, 2 June 2011

Handmade Thursday...Fish Bubbles!

Inspire Me Beautiful
Making necklaces is always enjoyable but sometime when a quirky idea comes together its really fun. Today's efforts started out as a set of symmetrically strung blue and white oval beads with a rhodium plated fish as the focal point.  It all looked rather boring until inspiration struck. The stripy, moulded ovals reminded me of bubbles.....
.......a  hour or so of rearranging and stringing beads at my workbench and Fish Bubbles (picture below) was the result. I've already got a madcap home in mind for this particular fish but intend to make some more.


More Handmade Thursday ideas can be found here

Thursday, 26 May 2011

Handmade Thursday...


..or any other day in my case but as Thursday is the last day before the weekend here in Dubai and a day when not much happens in my otherwise busy schedule I usually get more time to be creative. So when I stumbled across White Lily's blog and her Handmade Thursdays I couldn't resist sharing it with you nor posting something from me!


Today has been no exception in the extending chain of Thursdays so far in 2011, some further work on an as yet unfinished silver clay peapod pendant this morning. Then I also fired and burnished a couple of tiny squiggly square bits of clay ready for some future earrings, made two necklaces and a saucepan of vegtable soup and that was just my mornings efforts.

The first necklace was my entry in a challenge (see today's previous post) whilst the necklace pictured above is made from some beads I found amongst a huge second hand lot I bought on eBay a few months ago. These ''beads'' (they are not exactly round) are big chunks of pink resin, some clear and some frosted. Surprisingly for their size they weigh very little. I've teamed them up with some gold-coloured, wavy plastic spacers, 60cms of fancy cream giftwrap chord, a couple of smaller gold-coloured metal beads with large holes and a gold-coloured toggle fastening. The latter was bought in Texas when I was there last year. It was also an opportunity to practise some knots rather than using jump rings or other mechanical means to join components together!

If you want to have a go at something like this, here is how I assembled it.
  • First wrap some sticky tape tightly round either end of the chord to stop it fraying as you thread it through the beads. Double up the chord and thread both ends through the chunky beads adding a gold spacer after each one, I alternated the frosted and clear beads. 
  • Use a sheetbend to join the ends of the chord together and apply a little clear nail varnish or superglue to hold the knot firm. Adjust the chord so that the knot sits close to one of the end beads and when you hold it up by the two loops the central bead is in the middle. 
  • Next thread on a few more spacers to cover the knot on one side, add a metal bead. Then add spacers and a metal bead to the other side to match. 
  • Taking the doubled chord tie a series of three overhand knots close to the beads on either side to hold everything in place (more if you need to shorten the necklace length), then push each loop through the eye in the fastening and pull over the fastening to create a larkshead knot.
One Pink Chunks or is that Punk Chicks necklace!

For more on Handmade Thursdays click on the button below

Inspire Me Beautiful

Cache-Cache Challenge

The lovely scene to the left is a painting from 1873 by Berthe Morisot, the first of the female impressionist painters. Entitled Cache-Cache (Hide and Seek) it also sets the theme for this months Art Bead Scene challenge.

I loved the colour palette (see below) derived from the picture. And having just made my first silver clay bead from an oddment of clay I'd rolled out, thought I would try making something that combined both. I have also wanted to try making something a bit "folksy'' inspired by some of the slender pieces I've seen for sale in the shops recently. This challenge was my chance to put everything together.

So with a handful of silver speckled glass beads in pale mauve, green, cream and brown plus a hand-made silver wire hook and some shimmery brown embroidery silk, my very first bead has become wearable. Crocheting embroidery silk to form mock chain either side of the central interest is a great way of making a soft delicate thread for a necklace.

Not only is this my first hand-made bead it was also a trial with patterning the surface of the clay using a texture sheet. I am pleased with the result though the pattern is so fine my photography skills don't do it justice.

Finished Piece


Bead Close Up

Monday, 16 May 2011

Necklace Blues

Looking Across Weymouth Harbour
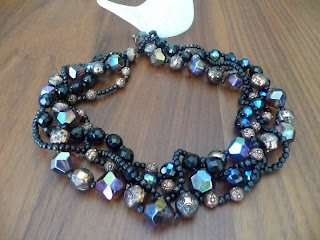
Its been a while since my last post, I've been on hols in the UK then seemed to dive into all sorts on my return except jewellery making. Anyway while sitting in Weymouth Harbour one afternoon during Easter week I strung four strands of beads on some nylon I found in the bottom of my boat bead stash judging from the reel it was probably fishing line. Yes, I have managed to establish bead stashes all over the place rather like a squirrel hoarding nuts for the winter, Dubai, boat and our lock up garage in the UK!

The design idea I had was for a chunky collar style with the four strands plaited together and having choosen a variety of black or dark brown beads I had in mind a piece to dress up a casual white or black (t-)shirt for the evening. The larger glass beads are multi-faceted and reflect rainbow-like hues whilst the seed beads used are matt black plastic with a hint of gold. To add to the overall midnight effect I included two sizes of copper coloured beads. Stringing was easy even if it meant a trip to the lovely Jezebels Jewels in St Mary's St, Weymouth for some small copper spacer beads decorated with pretty flowers. Plaiting was quick and the piece seemed to be coming together. What I lacked was some form of fastening prefereably in copper or black, my stash has silver coloured catches and jump rings a plenty but nothing to compliment my efforts.

Eventually I knotted the strings loosely together and buried them in the contents of my sailing bag for the trip back to Dubai. Back home I realised I still had nothing suitable - gold, antique silver and even brass but nothing copper coloured. The strands languished on my workbench teasing me each time I entered the room. Then for several days I mulled over ideas, pulling books and back copies of magazines off the shelf to flick through the pages until inspiration hit. But I wasn't completely confident the idea would work so I continued to mull it over and sketch it on bits of paper.  Over coffee with some craft-y friends I mentioned my dilema and Leanne, another a far more skilled jewellery maker encouraged me to give it a go. So here is what I did:

I took two long lengths of thinner nylon beading thread each twice the length of my original strands. I then strung some of the matt seed beads onto both lengths and slid them to the middle ensuring there were enough seeds to fit snuggly around one of the large dark brown glass faceted beads. This will form a loop fastening with a large faceted bead on the other end of the necklace as the toggle. Then all four ends were threaded through a single seed bead and one of the larger sized "copper" beads. Then I took each of the resultant four strands and restrung my original four strands and plaited them together fairly loosely. A beading needle helped me mostly pick up the beads off their original strands which speeded things up a bit and helped me keep fairly close to the original pattern.

Next all four threads were threaded through a single seed bead, one large faceted bead (the toggle) and another seed bead before returning back through the previous two beads. Then I spent sometime easing each strand tight in turn, threading its tail down through one of the strands of beads before knotting it round the thread, threading it through three or four further beads and trimming the end.

The end result was a simple bead and loop fastening which ensured the continuity of the pattern right around the necklace. And the necklace itself is a chunky piece that catches the light and sparkles beautifully, just waiting for someone to wear on a night out. The lesson learned was to think through the fastening before stringing the beads. If I'd done that I would have been able to wear the necklace when we dined at Perrys in Weymouth that week!

Thursday, 12 May 2011

Very Chuffed....

....to find that my entry in the Make Jewellery Issue 25 challenge was the winning one!

I was inspired by the pearls and chain set that was part of the Match Point designs on p27 of the magazine, a gold chain and creamy pearl concoction.  I didn’t have quite the same ingredients in my stash but I did have some lovely soft mauve glass pearls and a length of antique-silver chain that I had already earmarked to put together for a smart day to evening necklace so the unusual, asymetric design in May's magazine was timely and the challenge the kick start needed to make it. Apologies for the rather overlit photograph below, defintely need to practise.


Here's what deputy Editor Melissa said about my efforts:


Hello everyone,
Once again we’re delighted to announce the winner of the Make Jewellery challenge, for issue 25! The main themes of vintage and steampunk inspired some fabulous entries, that were truly striking!
After much deliberation, we finally came to a decision, so it’s congratulations to bahrain susie with her lovely pearls and chain set inspired by the project Match Point in issue 25 (p27). She’s made the design her own by using antique silver chain and soft mauve pearls to create a look of understated elegance in keeping with the vintage theme. So congratulations (and PM your address to me at melissa@aceville.co.uk so we can send out your prize!).
I’d also like to thank everyone else who entered and don’t forget, we will be running another challenge based on issue 26 very shortly. Please do check it out and enter again, and spread the word to your fellow forumites - good luck!
Melissa 

If you'd like to see the other lovely entries then go here. Perhaps this post might inspire you to enter the next challenge (Issue 26) when its announced later this month. Meanwhile it'll be sometime before the cheesy grin is wiped off my face.

Monday, 4 April 2011

Silver Clay Delight Part II

Well I finished my four week Art Clay course and, though I say it myself, am extremely pleased with the results. Here are my final three pieces:
Twig Brooch with with blue stones

Initial Pendant with a pearl

Snake Ring  (apologies for the fuzzy picture)

The Twig is the one I'm proudest of even though it is not something I would wear. It caused me heartache when it broke not once but twice during its creation, making me realise how fragile unfired clay is. Fortunately the rough bark-effect meant it was easy to mend with clay paste and completely hide the repair. I love the bark effect which was achieved by applying clay paste to my rolled out sausages with a toothpick! Carving out the dried clay to insert the brooch parts was tricky and required not only a steady hand but a certain amount of engineering skill to ensure everything would be lined up when the pin was added after firing. I loved the challenge.

All three of these were fired without the stones in their settings. The pearl was particularly fiddly to slot into its position on the wire stem that I'd inserted into the wet clay, a reminder that you have to think through the design and assembly before making it. And during firing I almost ruined one of the settings on the brooch by heating the fine silver a little too much causing it to melt a bit. Alls well that ends well and there was just sufficient to push around the stone without resorting to the superglue!

It was good too to have Patricia and Rose join me for the last couple of weeks, if nothing else it reminded me of how far I'd come and we were abel to bounce ideas off each other too. Rose had done some silver clay work using PMC previously and Patricia is a silversmith used to working with the solid metal. However now I'm on my own I'm a little nervous that I won't be able to achieve the same quality of workmanship without the watchful eye of tutor Lisle. I have some ideas and am currently thinking through how to approach them (one good lesson I learnt from the past four weeks). Hollow patterned beads, a pendant with a diamond set into it and a star fish are potential candidates for my next project. I just wish I could draw!

Thursday, 24 March 2011

Challenging Challenges

Having enjoyed the Spring Is Sprung challenge set by Linda Jones at the WireWorkers Guild last month I've decided to enter a few more. Making something to meet a brief set by someone else exercises the greater grey matter not only in choosing colours, materials etc to match the requirement but also ensuring that the more technical side of bringing it all together works. Thinking of the layout of the piece, how it will fasten and how the various components can be joined together are as much of a challenge sometimes as the more creative aspects.


So here are a few challenges you might be interested in:

Also the Wire Workers Guild will publish any photos of pieces submitted before the end of March in their gallery - the piece must obviously contain some wire art. Check out the website for the rules.

Good luck and if I come across any more challenges I'll add them to the list above! Mean while here are a couple of photos of my entry to the MJ Spring challenge:


Sunday, 6 March 2011

Silver Clay Delight

Silver Daisy - my first ever piece in silver clay
Back in January I met a lovely lady, Lisle Skirker, at an Arte market in Dubai Festival City shopping centre. Desperate for a fix of jewellery making (my beads and equipment were still in transit from Bahrain to Dubai) and wanting to learn a new skill I signed up for her Art Clay evening workshop. Three hours later I had myself a new silver pendant (picture left) and was well and truely hooked!

On a short trip to the UK to renew my passport later that month I visited Hatton Garden to purchase supplies of clay and spent a happy few days acquiring various tools on the shopping list Lisle had given me.

Last month I began a four session certificate course in Art Clay with Lisle* at DUTAC a wonderful arts centre located in the MoE shopping centre close to our home.

So what is silver clay? Its finely powdered silver that has been made malleable by the addition of a clay medium as a binder. It can be rolled, moulded or syringed just like potters clay although it does need to be kept moist as it is quite fast drying. Once fired the silver powder sinters to become 99.9% solid silver. This is finer than sterling silver and in the UK once assayed, pieces can be hallmarked. Similar clays in other metals including gold, copper and bronze are also available and there are several brands, the most well known ones being PMC and Art Clay. I am using the latter. When fired the clay shrinks slightly as the binder burns away so for any piece where size is crucial eg a ring, it's necessary to take this into account. Different brands shrink different amounts and require slightly different firing times for the same weight of clay. Lisle has been on hand to provide all the information and advice needed so I am beginning to feel confident that I can work it out for myself.

The pictures below record the pieces I've made so far - I love the medium and the results, even the slightly wonky heart pendant which was the first and only item so far that I've made on my own at home. Everything I've made has been torch fired. I'll share more about the process as I complete the course.


Leaf Pendant using a Syringe and Dichromic Glass Carbouchons

Dancing Hearts - first solo make at home


Tiny Silver Ring

Hollow Silver Earrings


Silver Mint Impressions - made using paste on a mint leaf


* If you want to know more about Lisle and her courses click here or find her here on Face Book.

Friday, 18 February 2011

A Good Idea But...

Sometimes what seems a good idea doesn't exactly translate into a wearable item. It happened to me this week. Inspired by some pretty pale blue crackle beads and a desire to make something chunky I spent an afternoon constructing an intricate 3D piece (picture left). The end result looked great on my worktable where it curved beatifully on the flat surface but oh dear, round the neck it failed to take up curves in additional directions. The three strand effect made it too stiff and it lost its fluidity the instant it was worn. The piece looks awkward, uneven and ungainly, the prettiness of the glass beads lost in the stiffness of the form.

Undetered I tried again with three parallel strands creating a choker in pink and smoke coloured crackles. This time the stiffness worked in my favour and it stands up beautifully round the neck when worn making me very pleased with the end result. An added bonus was discovering my smoky choker with its chain connecter works equally as well as a bracelet doubling my opportunities to wear it!


Not being an engineer I'm still trying to figure out what makes a structure rigid and what makes it fluid, hence what makes a good necklace shape and what doesn't. I think the answer lies in the shape of the bead and the stringing method used.  My guess is that the three continuous strands in my first piece were working a bit like the steel cables of a suspension bridge. By introducing some additional links in the piece it would have gained some articulation so it could lie over the shoulders as well as curving round the neck. For now I've dismantled it and will experiment with some alternatives.

Thursday, 3 February 2011

New Year, New Necklaces

A belated Happy New Year to all!

I've been away in the UK renewing my passport as since my last post we've relocated to Dubai and with less than 6 months to run on said passport they wouldn't issue my residency. Anyway I'm back, completed the unpacking as well as finding time to make some necklaces.

This black and white one (left) was inspired by something pretty I spotted in Bentalls, Kingston (who have a lovely selection of vintage pieces by the way) made with crystal rondals and antique copper wire. I loved the way beaded headpins were threaded through parallel necklace chains to fan out round the wearer's neck. My version is slightly simpler as there is only one chain but reminds me of ancient Greek designs with the monchrome beads and the spirals. 

This choker (right) is made from recycled glass beads and copper rings combined with some aqua coloured twizzle wire and a few mock antique-copper beads (they are actually plastic!). Twizzle wire is funky spiral wire mesh that is hollow to you can thread lengths on tiger tail to make interesting "chains". The copper rings are part of a stash of various coloured metal rings I now have, purchased as a sales bargain necklace from Tie Rack (also in Kingston upon Thames, UK). A few pounds bought me three necklaces made from lots of metal components; chains, rings and more in various colours. There will be more recycled metal I'm sure shortly as amongst my purchases were a collection of dark, almost black textured metal rings.

Whilst in the UK I drove down to Devon to visit some family and on the way home made a detour to the Craft4Crafters event in Exeter. It was my first such show and I was amazed how crowded it was - are all the women in the SW making cards, knitting, quilting, embroidering, making jewellery? It was good to see that home crafts are not dead! Anyway I made a few purchases (shhh don't tell my husband) and came away with a selection of twizzle wire from the Crazy Wire Company plus a few texture plates and a book. The latter two items related to a new interest - silver clay - more in a later post.


The blue chain necklace pictured left is another bit of fakery - all the blue beads are plastic "turquoise"! The chains were recovered from one of my sales bargain necklaces (see above) and I was able to crimp the thinest one to keep the small beads arranged around it using some interesting heavier duty textured crimps. It all goes to show that pretty baubles need not be expensive.

I recently read an article about Lina Baretti, a Corsican jewellery maker who made stunning pieces for top fashion designers like Chanel and Schiaparelli (World of Interiors, Feb 2011). Her elegant pieces often used cork, ribbon, feathers and simple glass beads.  You can see some pictures of her work in Maia Adams blog on the same article here.
And finally a birthday present for my sister, made just before I left for the UK. Glass lampies and flower charms from South Africa, some silver plated chain, glass leaves and a pretty dragon fly charm make for a sparkling spring-like necklace to cheer up winters gloom.